Activities for kids at home
Children's instructors Melina, Brielle, Sage have put together some engaging activities for children and families to do at home. Enjoy popular crafts, activities and games from our children's classes and camps!
Also, checkout our activities and videos on the Virtual Recreation page
Click on the links in the table below to go to the instructions for each activity:
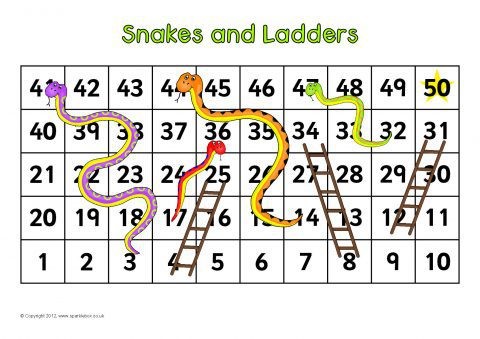
Sidewalk Chalk Snakes and Ladders
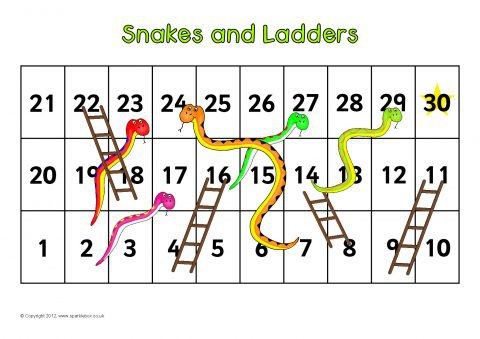 An Edmonton family has come up with an inspiring idea to keep fit while physical distancing! Check out the full story here on CTV News Edmonton. All you will need to make this Snakes and Ladders game is sidewalk chalk and a graphic of the Snakes and Ladders game as shown here.
These images were used courtesy of Sparklebox UK. Visit the Sparklebox website for printable versions.
_____________________________________________________________________________________________________________________________________________
Spring Scavenger Hunt
Purpose: get outside and hands-on with nature
Ages: Any!
Materials/equipment needed: closed-toe shoes, long pants, camera, bucket or something to collect goodies with
Time: 1 to 2 hours
Put on your adventure gear and head out to your backyard or favourite hiking trail/park. Search high and low for the spring treasures on this list. Be sure to tread carefully, do not take any live plant out of the ground, and treat animals with care. Take lots of photos of your finds and the fun you have along the way!
Look for:
- 3 different types of flowers
- 3 different types of birds (bonus points if you can sing their song!)
- Buds growing on a tree or shrub
- Animal tracks (can you tell what they are?)
- Tree seeds or saplings (hint: look closely on the ground in between the trees for bright green small growths)
- A squirrel having a snack
- Lichen growing on a rock or tree
- Something purple
- A worm (hint: look in damp soil)
- A newt (hint: look in damp soil, under fallen and decaying logs. You might also see its eggs!)
- A berry bush (hint: there will be no fruit yet, so look at the leaves, height, and colour to help you decide what it is!)
- Something man-made
- Something you can make tea out of
- Somewhere an animal might live
- Something smooth and something rough
- Something that is your favourite colour
- 5 pinecones
- 3 rocks that look and feel different from each other (colour, size, texture)
- 10 pieces of garbage (pick them up and take them with you to dispose of properly)
Bonus point: Take a photo of your group all together!
_____________________________________________________________________________________________________________________________________________
Egg Drop Challenge
Purpose: creativity, teamwork, critical thinking
Age: 8 - 18 years
Materials needed: cardboard, newspaper or recycled paper, tape, scissors,
Time: 1 to 2 hours
3...2...1...drop! Gear up for an activity that requires critical thinking, designing, physics, and teamwork. Give the participants a set amount of time to design and build their “nest”. The purpose of the “nest” is to keep their egg from breaking as it is dropped from increasing heights.
Depending on the size of the family participating, this can be done in teams or as a group. Alterations can also be made to building materials provided (such as reducing the number of tape participants are allowed to use) and time allocated to increase the level of difficulty and give more challenge.
Once the building time is complete, head outside to start the testing! Drop the nests from waist height, shoulder height, head height etc. until the nest and/or egg breaks. Allow time to redesign and strengthen if participants have new ideas based on their observations.
Depending on the age of the participants, this activity provides an excellent opportunity to debrief and reflect on the experience. Questions to ask include: “What do you think went well?”; “What would you improve on for next time?”; “Did your group work effectively together?”; “What did you learn?”.
Have fun!
_____________________________________________________________________________________________________________________________________________
Cloud Dough
Purpose: Bring your creativity to life and use your imagination to explore how you can build different shapes, letters and numbers using your cloud dough.
Age: 2 years and up with adult supervision.
Material: hair conditioner (use a cheap kind), cornstarch, a bowl, popsicle stick or spatula to mix, storage container, and gel food colouring (optional).
Time: Takes around 5-10 minutes to make the dough and then an infinite amount of time to play with it.
Do your kids love to play with playdough but worried that it is going to get everywhere? A fun and entertaining alternative is cloud dough. With the cloud dough, your child/children can create numbers, letters and shapes. Or you may use plastic figurines to set up stories to help your child use their imagination.
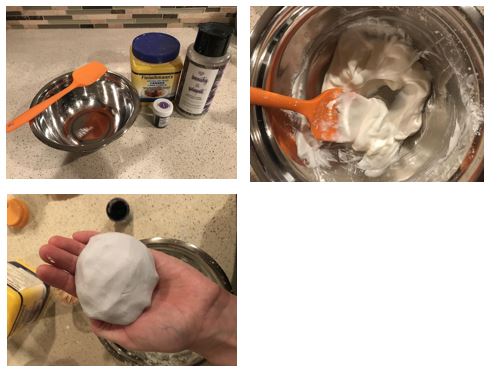
Steps:
- Gather the ingredients needed.
- Mix equal parts conditioner and cornstarch in a bowl. (⅓ cup worked well if the dough was for one child but feel free to double if needed) Mix together and the dough should look like a thick glue.
- Continue to add cornstarch until you can no longer mix the dough with a spatula or popsicle stick. The ratio will be around 2:1. Now you should start mixing the dough with your hands.
- If the dough is too dry add a bit more conditioner if the dough is too wet add more cornstarch. Once it is to the texture you are happy with, you may choose to add food colouring.
- Store in a ziplock bag, airtight container or saran wrap.
_____________________________________________________________________________________________________________________________________________
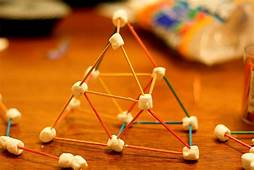
Marshmallows or Jelly Bean Toothpick Building
Purpose: Use a creative mind to engage in play while learning to overcome building challenges.
Age: 4 and up
Materials: Toothpicks and jelly beans (or mini marshmallows)
Time: 30 minutes- 1 hour
Let your child’s create cap turn on. By using only 2 materials children can be creating an imaginative world through play. They can use their critical thinking skills to build bridges, towers, rocket ships and so much more.
_____________________________________________________________________________________________________________________________________________
3 Ingredient Fluffy Slime

Purpose:creativity, hands-on
Age: 5 and up
Materials: Bowl, spoon, liquid glue, shaving cream, contact saline solution with boric acid, storage container and food colouring (optional).
Time: 1 hour
Steps:
- In a medium-size bowl combine ½ cup liquid glue and add 2-3 drops of food colouring if you wish. Mix until the colour is fully mixed in.
- Add 1 ½ cups shaving cream. The mixture will start to look very fluffy.
- Add 1 tablespoon contact saline solution with boric acid. Mix the solution fully in. If the slime is still too sticky, continue to add a small amount of contact solution.
- Once it has come to the consistency that you wish, store it in an airtight container.
_____________________________________________________________________________________________________________________________________________
Sidewalk Chalk Paint
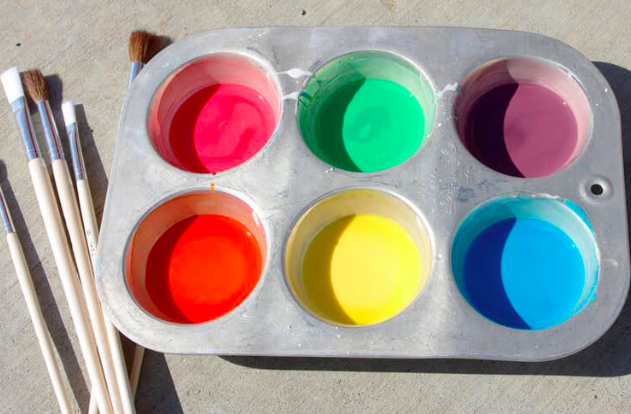
Purpose: Be creative, get outside and have fun!
Age: 2 plus
Materials: Bowls, spoon, ½ cup corn starch, ⅔ cup water, food colouring and paintbrushes. Containers for each colour will be needed also.
Time: 10-15 minutes to make the paint, 30 minutes plus to play with paint.
Is the sun shining and you need a fun activity to do outside? Chalk paint is a great way for kids to be artistic outdoors.
Start off by mixing the water and cornstarch together, until the corn starch is dissolved. Pour the mixture evenly into containers and add the desired amount of food colouring to each. If the paint seems to be too thick add a little bit of water until it reaches your desired consistency.
_____________________________________________________________________________________________________________________________________________
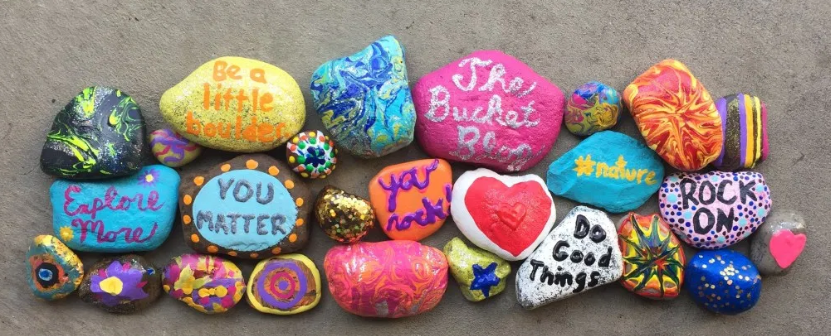
Painting rocks and spreading community cheer
Purpose: outdoor time and fresh air, creativity, creating a sense of community
Ages: 2 to 12
Materials: Paint, paintbrushes, rocks, other natural decorations like leaves and pinecones
Time: 1 to 2 hours
Now more than ever we are learning the importance of community support, compassion, and acts of kindness.
Take the opportunity to make your home and community a little bit more colourful with this fun activity. Let the artist hunt for their perfect canvass, which could be anything they find outside, but rocks are recommended.
Wash the rocks thoroughly, pull out your paint, and create a colourful masterpiece. Once your creation is dry and complete, bring it to a neighbour and leave it on their doorstep with a note to say hi, and that your family is there for support.
*Note: If you don’t have paint, an alternative activity would be to draw/colour with paper and whatever colouring utensils you have at home. It will be the thought that counts!
_____________________________________________________________________________________________________________________________________________
Shaving Cream Fun!
Purpose: Learning tool to help children spell words, letters, shapes, numbers or pictures.
Age: 2 plus
Materials: Shaving cream
Time: 20 plus minutes
Do you want your children to use a tool that is beneficial for their learning and also is fun? Shaving cream is a great tool to help children with numbers, letters, shapes and words. All you need is a can of shaving cream and a clean surface.
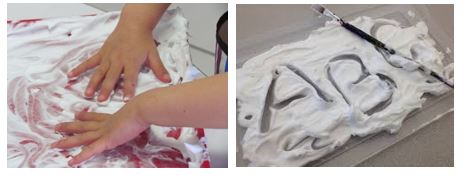
It is recommended to do this activity on a table, over a garbage bag on the floor or even in the bathtub. Spray the shaving cream on the surface of your preference, then let your children start using their imagination, the opportunities are endless!
_____________________________________________________________________________________________________________________________________________
Sugar Crystal Experiment
Purpose: Learn about science
Age: 3+
Time: 5 minutes to prepare, approximately one week to watch and wait for completion
Materials: white sugar (6 cups), food colouring (3 different colours is best), water (2 cups), mason jars (3), small bead or marble and/or string and popsicle stick, magnifying glass.
Get hands on with science as you make your very own colourful crystals at home! Here are the steps:
- Boil 2 cups of water in a medium saucepan.
- Add 6 cups of sugar to the water and stir until fully dissolved, then remove from heat.
- Carefully pour the water and sugar solution into three separate mason jars
- Add different colours of food colouring to each jar and stir until you have reached a desired colour.
- Add a small bead or marble to the centre of the jar so that the crystal will form around it. If you do not have a bead or marble, you could attach a string to a popsicle stick and place the stick overtop of the mason jar lid so that the string hangs into the centre of the jar.
- Let the solution cool and sit uncovered for at least a week, and do not put it in the fridge or else the crystals will be sticky.
- Once the crystals reach a desired size, pour out the remaining sugar water and remove your crystals (you might need to heat the outside of the jar in a warm water bath to help release the crystals.
Use a magnifying glass to examine them. What patterns do you see? Why do you think this happened the way it did?
_____________________________________________________________________________________________________________________________________________
Puffy Paint
Purpose: Make your own paint for kids to get creative with
Age: 3+
Time: 5-10 minutes to create, then unlimited play time!
Materials: shaving cream (¾ cup), bowl, spoon, white glue (¼ cup), flour (¼ cup), food colouring, squeeze bottle, paint brushes
Out of paint? Look no further than this unique paint recipe which shows kids interesting chemistry and allows them to get creative. Mix the ingredients in the same order as they are listed in the materials list with a spoon in a large mixing bowl. Put the mixture in plastic squeeze bottles so they do not dry in the air (you could use mason jars or any other air-tight container if you do not have squeeze bottles).
_____________________________________________________________________________________________________________________________________________
Sun-baked Recycled Crayons
Purpose: to make art supplies out of recycled materials
Age: 3+
Time: Approximately 1 hour
Materials: broken crayons (with paper removed), muffin tin, cooking spray, sun and/or preheated oven
This activity is a perfect way to reuse old and broken crayons and create new ones!
Gather your broken crayons and break into smaller pieces, removing the paper wrapping as you go. Grease your muffin tin and fill tins ⅓ to ½ full with the small crayon pieces. Place the tin in direct sunlight, check every 30 minutes until the pieces are melted. You could also put the tin in an oven preheated to approximately 100 degrees fahrenheit. Remove from heat when fully melted, and let them cool completely until they are solid. Remove and colour with your new colourful crayon creation!
_____________________________________________________________________________________________________________________________________________
Handprint Spring Lilies

Purpose: get creative and have fun!
Age: 2-10
Materials: coloured paper, scissors, clear tape, pencils, pipe-cleaners, string or ribbon
Time: 30 minutes
This beautiful craft makes the perfect spring and Easter decorations.
- Trace your hand on to your paper of choice (if you do not have coloured paper, white paper makes beautiful white lilies) with a pencil - trace lightly.
- Carefully cut out your tracing with scissors. Roll the cutout into a cone shape, and tape the bottom with clear tape, leaving a pencil-width hole. The finger portions should be facing up.
- Gently fold back the fingers so that they look like petals, as shown in the photo.
- Place a green pipe cleaner through the hole and secure with tape.
- Add yellow pipe cleaner to represent the pollen. If you do not have pipe cleaners, use sticks and flowers from your backyard will work perfectly, and will give it a realistic effect.
- Repeat until you have the desired amount, and tie into a beautiful bouquet.
_____________________________________________________________________________________________________________________________________________
Tulip Potato Prints
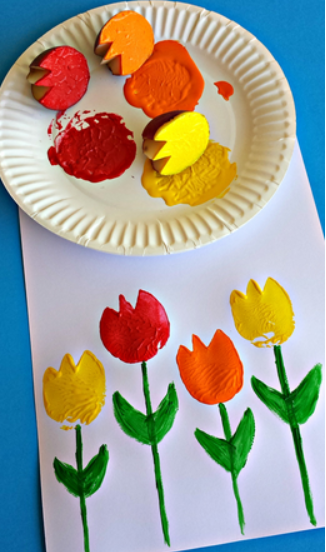
Purpose: get creative and have fun!
Age: 2 to 5
Materials: Potatoes, paint, paper
Time: 30 minutes
This spring craft will make a great Easter card for loved ones, and is a simple way to make a beautiful creation. Carefully cut a potato in half, and make cuts to create the tulip shape as shown in the photo. Dip the flat side of the potato into paint, and stamp away! You can use paint, crayons, markers etc to add decorations and details (make sure the paint is dry before you use markers or crayons).
_____________________________________________________________________________________________________________________________________________
Recycled Toilet Paper Bunny Stamps
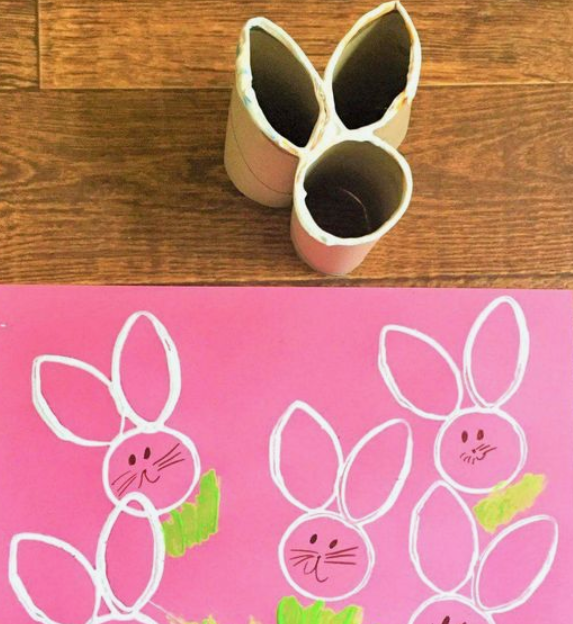
Purpose: emphasize recycling, and get creative!
Age: 2 - 5 years
Materials: toilet paper rolls, glue (white glue or hot glue) paper, paint, black marker or pen
Time: 30 minutes - 1 hour
Take the opportunity to use items from your recycling bin to talk about recycling with your kiddo, and to make a fun Easter craft at the same time!
- Flatten the sides of two rolls of toilet paper, as shown in the photo.
- Arrange with a regular role as shown to make a bunny stamp.
- Once the glue is dry and the stamp is secure, dip into the paint (any colour you have will do!).
- Let the paint dry, then add details like the eyes, nose, mouth, and whiskers with markers or pens.
- Decorate the background of the paper as desired.
_____________________________________________________________________________________________________________________________________________
Fingerprint Art - Easter Bunnies and Chicks
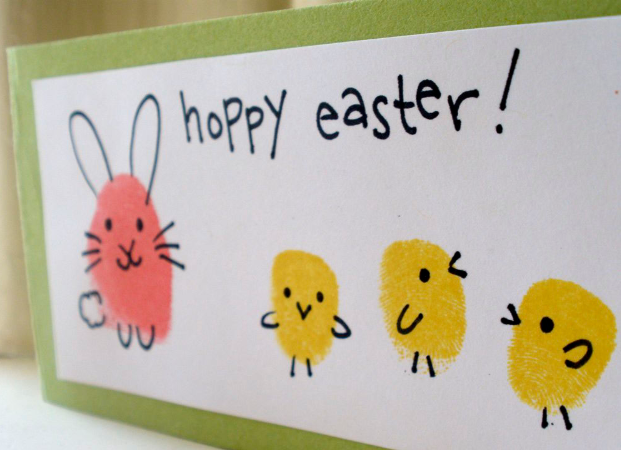
Purpose: Easter creativity
Age: 2+
Materials: Paint, pens or markers, paper
Time: 30 minutes to 1 hour
This fun, simple spring and Easter craft will surely be a hit, and would make a great card for family and friends. Create fingerprint marks using paint of your choice. Once the marks are dry, add details with a pen or marker.
_____________________________________________________________________________________________________________________________________________
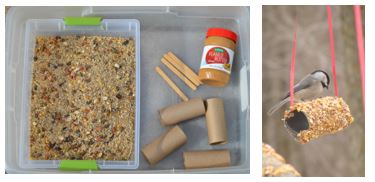
DIY Bird Feeders
Purpose: Sparks creativity and teaches children the importance of caring for animals.
Age: 3 and up
Materials: empty toilet rolls, peanut butter, bird food or various types of seeds, popsicle sticks, and string.
Time: 30 minutes - 1 hour
Help teach children the importance of caring for animals by creating a bird feeder.
- Start off by poking a hole at the top of the toilet paper roll.
- Thread the string through and tie a knot at the end of the string. This is what you will use to attach to a tree.
- Spread the peanut butter all over the toilet roll with a popsicle stick.
- Once completely covered roll the seeds all over the peanut butter.
- Try your best to get the peanut butter completely covered.
- Once covered you can hang it outside for the birds to enjoy!
_____________________________________________________________________________________________________________________________________________
DIY Bookmarks
Purpose: get creative and encourage children to read
Age: 3+
Time: 30 minutes - 1 hour
Materials: Paper, hole punch, yarn, scissors
Create fun, colourful bookmarks that your children will get excited about using!
- Begin by cutting a rectangle out of your desired paper with scissors (construction paper would be best, but white paper will work).
- Decorate with markers, stickers, glitter, paint etc.
- Punch a hold in the middle of the top of the paper.
- Create fun tassels by threading through yarn (you could add beads or other decorations as desired) and tie in place. Happy reading!
_____________________________________________________________________________________________________________________________________________
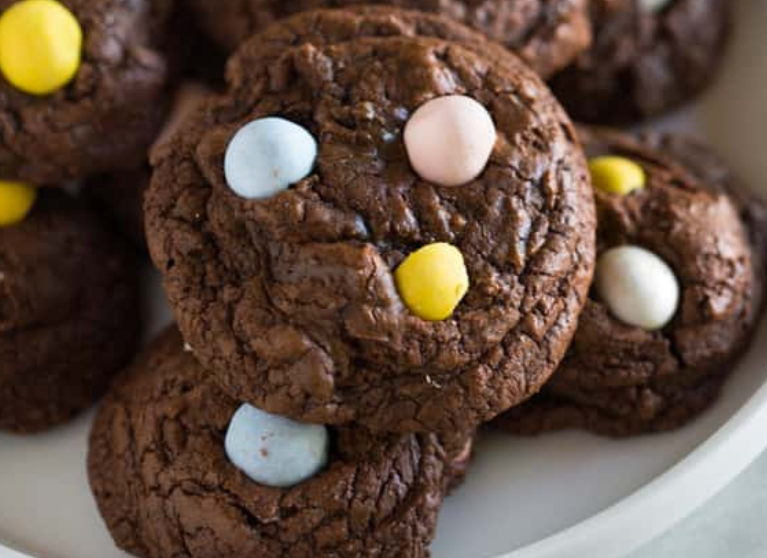
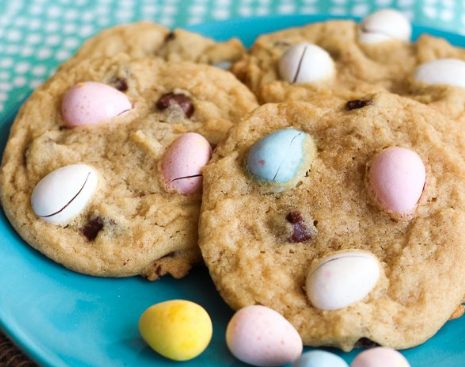
Chocolate Cadbury Mini-egg Cookies
Ingredients:
1 cup unsalted butter
2 eggs
1 cup white sugar
1 cup brown sugar
1 tsp vanilla
6 tbsp cocoa powder
1 tsp baking soda
1 tsp baking powder
½ tsp salt
2 ½ cups flour
1 10oz bag of Cadbury mini-eggs
Instructions:
Place mini eggs in a sealed, Ziploc bag and smash with a rolling pin. Roll over the eggs, pressing down firmly. Leave some of the mini-eggs out to decorate the top of the cookies once they are done baking.
Cream together butter, white sugar and brown sugar in a large mixing bowl. Add in eggs one at a time, then add vanilla and mix again.
In a separate bowl, whisk together flour, cocoa, salt, baking powder and baking soda. Slowly add the dry ingredients to the wet ingredients until they are fully incorporated.
Stir in crushed mini-eggs with a wooden spoon.
Bake on a lined or greased cookie tray for 7-9 minutes at 350 degrees Fahrenheit.
Remove from the oven and top with whole mini-eggs, as desired.
_____________________________________________________________________________________________________________________________________________
Peanut Butter Mini-egg Cookies
Ingredients:
1 ½ sticks of butter, softened (¾ of a cup)
1 cup peanut butter
1 cup white sugar, plus ¼ cup set aside in a bowl
1 cup brown sugar
1 tsp vanilla
2 eggs
½ tbsp baking soda
2 - 2½ cup flour
1 cup milk chocolate chips
1 bag Cadbury eggs
Instructions:
Cream together butter, peanut butter, both sugars, vanilla and eggs with a hand mixer or wooden spoon.
Add baking soda and flour (one cup at a time). After 2 cups have been added, if the dough remains sticky, add the remaining ½ cup. Stir in chocolate chips and mix until combined.
Roll a spoonful of dough into a ball, roll in the remaining white sugar.
Bake on a lined or greased cookie sheet at 375 degrees Fahrenheit for 8 to 10 minutes.
Place 2 to 3 mini eggs on top once cooking is complete, as desired.
_____________________________________________________________________________________________________________________________________________
Focaccia Bread
Baking bread is an excellent, hands-on activity that provides opportunities for children to learn about baking and simple chemistry. This recipe for focaccia from the Food Network will surely be a hit!
Ingredients:
1 tsp sugar
One ¼ ounce package of dry active yeast (2 ¼ tsp)
3 cups all purpose flour, plus more for dusting
1 cup whole wheat flour (could sub for more all purpose flour if you do not have all purpose flour)
2 tsp kosher salt
½ cup extra virgin olive oil plus more for greasing the baking pan
Flaky sea salt for sprinkling
Fresh or dried rosemary (optional)
Instructions:
Combine 1 ½ cups of warm water with sugar in a large bowl. Sprinkle the yeast on top of the water and set aside until bubbly (5 to 10 minutes).
Whisk together flour(s) and kosher salt in a medium bowl.
Once the yeast is ready, add the oil to the warm water bowl, then add the flour mixture and incorporate until a shaggy dough forms.
Transfer the dough to a floured work surface and knead until the dough is smooth, elastic, and slightly tacky (approximately 5 minutes).
Lightly oil the large bowl which was holding the dough, and place the ball of dough back into the bowl. Cover and let rise in a warm place until it is doubled in size (approximately 1 hour).
Oil a 11 inch by 17 inch rimmed baking sheet. Punch the dough down in the bowl and transfer to the baking sheet. Gently pat and stretch the dough to the edges of the baking sheet. Dimple the dough with your fingers. Loosely cover and let rise in a warm place again until it doubles in size (approximately 30 minutes).
Preheat the oven to 425 degrees fahrenheit. When the dough is ready, uncover and generously drizzle with olive oil and sprinkle with sea salt (and rosemary or other herbs as desired). Cook for 20 to 25 minutes, or until golden brown.
_____________________________________________________________________________________________________________________________________________
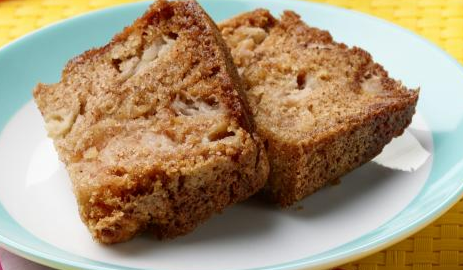
Apple Bread
Ingredients:
1 ½ cup sugar
5 small McIntosh apples, peeled and cut into ¼ inch cubes
½ tsp lemon zest, finely grated
Cooking spray or oil to grease cooking pan
2 cups all purpose flour
1 tsp baking soda
1 tsp ground cinnamon
½ tsp nutmeg
½ tsp salt
⅔ cup vegetable oil
2 large eggs
½ - 1tsp vanilla extract
Instructions:
Mix and work the apples, sugar and lemon zest together in a large bowl, using your hands. Let the mixture sit, tossing occasionally for 30 minutes.
Preheat the oven to 350 degrees, and coat a baking pan (10 inch x 5 inch x 3 inch) with cooking spray or oil. If you do not have a large enough baking pan, you could use a bundt pan.
Once the apples have rested for 30 minutes, sift flour, baking soda, cinnamon, nutmeg and salt into the bowl and stir until just combined.
Whisk together oil, eggs, and vanilla in a medium sized bowl. Add mixture to flour and apple mixture and fold until just combined (it is okay if a few lumps are left)
Our batter into the greased pan, and tap on the counter to settle and even out the batter.
Bake until golden brown and the top bounces back when pressed (approximately 55-60 minutes).
_____________________________________________________________________________________________________________________________________________
Chocolate Chip Cookies (Egg free, dairy-free)
These cookies are simply delicious and a favourite in Melina’s house! The recipe is naturally egg-free, and can be dairy free if you use shortening instead of butter. If your kiddo requires gluten-free goodies, simply use gluten free flour and oats. Enjoy!
Ingredients
1 cup shortening (crisco is best) *could use unsalted butter instead
¾ cup brown sugar
¼ cup white sugar
1 tsp vanilla extract
1 tsp baking soda
⅓ cup boiling water
1 ½ cups flour
½ tsp salt
2 cups large flake oats
1 cup semi-sweet chocolate chips
Instructions
In a measuring cup, mix boiling water with baking soda, and stir until dissolved. Set aside to use later.
Cream together shortening (or butter) with both sugars and vanilla.
Add the water and baking soda solution and mix again. Add flour and salt and mix until well combined.
Using a wooden spoon, stir in oats and chocolate chips. You could also add a ½ cup of walnuts or pecans if desired.
Bake at 350 degrees Fahrenheit for 10 to 12 minutes on a lined baking tray until golden brown.
_____________________________________________________________________________________________________________________________________________
Homemade Vanilla Cupcakes (made for decorations!)
These cupcakes are delicious and give the perfect opportunity to get creative. Add colour, decorate, and enjoy!
For the cupcake:
Ingredients
- 2 cups all purpose flour
- 2 tsp baking powder
- ½ tsp salt
- ½ cup unsalted butter, at room temperature
- 1 ¼ cup white sugar
- 4 large egg whites
- 1 cup milk
- 1 tbsp vanilla extract
Instructions
- Preheat the oven to 350 degrees Fahrenheit, and line 2 cupcake trays with paper liners.
- Sift together flour, baking powder and salt into a small bowl, and set aside.
- In a large mixing bowl, cream the butter until fluffy. Add the sugar and combine.
- Add 2 egg whites to the same bowl and mix until combined. Repeat with the remaining 2 egg whites and beat for 2 minutes consistently on a medium speed.
- Add half of the flour mixture and ½ cup of milk, mixing for 1 minute. Repeat and mix for another minute. Add the vanilla, and mix for 2 minutes
- Fill each liner ⅔ full of batter, and bake for 20 minutes. Remove and cool for at least 10 minutes before transferring to a drying rack for an additional 30 minutes until completely cooled.
For the icing:
Ingredients
- ⅓ cup softened butter
- 3 cups icing sugar
- 1 ½ tbsp milk
- 1 ½ tsp vanilla extract
- Food colouring (if desired)
Instructions:
Mix the butter and sugar in a bowl with a hand mixer on low. Add the milk and vanilla and continue to mix until smooth. Add food colouring if desired.
___________________________________________________________________________________________________________________________________________
Sidewalk Chalk Snakes and Ladders
An Edmonton family has come up with an inspiring idea to keep fit while physical distancing! Check out the full story here on CTV News Edmonton. All you will need to make this Snakes and Ladders game is sidewalk chalk and the graphic of the Snakes and Ladders game shown below: